

2. Go to the attribute editor and click polyCylinder1 then change the hight to 12 and the radius to .5. then go to the subdivisions height and change the subdivisions to 6.

3. Next make a rectangular prism and make make it any size you want. You will be changing the size in the step after this.

4. Go to the attribute editor again and change the width to 5.5, the height to .05, and the depth to 2. Then go to the subdivisions width and change them from 1 to 6.

5. Now switch to top view (hit space then click the top view). Right click and switch to vertex mode. 14 yellow dots should show up. Select the yellow dots and with your scale tool, (R) move the vertices around to make a leaf shape like the example to the right. Make sure to not use the move tool or else the leaf will not be symmetrical. Your leaf should look like a football shape from the top view.

6. Next make a really thing rectangular prism. The height should be thicker than the leaf. The width should be very small and the length should be very long. (As shown in the picture to the right).

7. Now select the rectangular prism and rotate it. Then duplicate it (Command + D) and with the move tool (W) move the prism slightly to the right keep duplicating with small equal spaces in between each prism.

8. When all the prisms have been made and are equally spaced, duplicate all of those and rotate (E) them so they are symmetrical across axis.

9. Select the leaf first and then select all the small prisms at once.

10. Go up to Mesh then go to Booleans and click on Difference.

11. Repeat steps 9 and 10 for the other side of the leaf and your outcome should look like this:

12. To make the curve of the leaf, go to the top view of the leaf again and switch to vertex mode. and select the vertices that are on the tip of the leaf.

13. Go to the side view of the leaf and rotate the vertices and move them down to start the curve of the point.

14. Select the vertices of each individual subdivision of the leaf and repeats steps 12 and 13 to get the curve of the leaf. The outcome should look like this:

15. Deselect the leaf and create a sphere of any size.
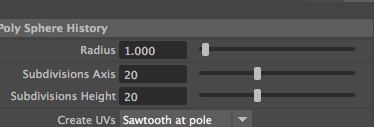
16. While still selecting the sphere, go to the attribute editor and change the radius to 1 and have both the subdivisions axis and height be 20.
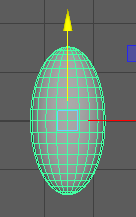
17. With the scale tool, (R) click and drag the Y-Axis square upwards so it makes an egg shape.

18. Center the egg in the attribute editor. The egg coordinates should be at (0,0,0), (make sure the cylinder is at (0,0,0) too). Then select the egg and move it up to the top of the cylinder but make sure the top edges of the cylinder do not show.

19. With the egg shaped sphere selected, go to vertex mode and select a
random vertex.

20. Once the vertex is selected, use the move tool (W) and move it out and in a random direction.

21. Do this with every other vertex and you should get a blocky sphere like the one shown on the right.

22. Next select the leaf.

23. Duplicate (Command + D) the leaf and with the move tool, (W) move it away from the other leaf.

24. Duplicate (Command + D) those leaves and create multiple leaves for the palm tree. Create a good amount to fill up half of the palm tree's blocky sphere. Then spread the leaves out to get a view of each individual leaf.


25. When the leaves are spread out, select a leaf and with the scale tool, (R) scale the leaf to a different size. Make them skinnier, longer, shorter, wider, more bent or straight.
 26. Scale each leaf to be a different size and shape as shown in the example on the right.
27. Select about half the leaves and then right click, go to assign new material and click Lambert.

28. Go to the color and select a green color that would fit for a color for the leaves. Then select the other half of the leaves and do the same thing but make the color darker than the other leaves. Do not forget to name the Lambert textures.

29. Select the tree trunk and follow steps 27 and 28 except make the lambert a tan color. Then name the color Tree_Trunk.

30. Select the blocky sphere and follow steps 27 and 28. This time, make the blocky sphere a darker color than the tree trunk. The outcome should look similar to the example on the right.

31. After the leaves and trunk is colored, select a leaf and move (W) the leaf to the top of the tree. Then with the Rotate tool, (E) rotate it so it touches the blocky sphere of the tree and so it looks like it is sticking out from the tree.

 32. Do this with each of the leaves, make sure each different colored leaf is somewhat separated from the same colored leaf. Make sure the leaves do not go through each other and that the leaves only go half way to two thirds of the way down the blocky sphere. Be careful to not leave any spaces on the blocky sphere without leaves.
33. Create two spheres of any size, you will adjust the sizes based on the tree size afterwards. Click on both of the spheres and then right click, go to assign new material and click lambert. Name the lambert "Coconut" and choose a yellow - green color.


34. Move the spheres up to the blocky sphere. Make sure the spheres are slightly touching each other and the blocky sphere. The spheres will be sitting just under the base of the leaves.

35. Next go to the side view (any side) and right click then go to edge mode. With your move tool, (W) select the edges that are horizontal and move them to the left or right so the base of the tree trunk is curved. The tree base should look similar to the example on the right.
36. The final product should look similar to the example on the right.
This technical tutorial blog is going to teach students and possibly some adults how to make a palm tree or a coconut tree. The tutorial takes some patience because there is quite a few steps in this specific tutorial. This tutorial blog will help those who are possibly needing to make a beach or an island with some palm trees or even just wanting to make a palm tree. It was also made to hopefully clarify some troubles students are having while making some leaves or even the trunk. This could be an important skill because making a palm tree will help those practice making leaves on a tree or the base/trunk of the tree. The steps above will guide students how to make a palm/coconut tree.
Links to help:
www.youtube.com/watch?v=DZaV7xcoLFc
or
http://www.3dtotal.com/index_tutorial_detailed.php?id=725#.VhbDGJ1VhHw
Proudly serving the world's leading financial and asset leasing companies with intelligent software technology for more than four decades. NETSOL Technologies leverages its strong business capabilities to find unique solutions to the challenges and limitations imposed by each new project and offers solutions that fill the gaps in performance.
ReplyDelete