This article was about the careers and opportunities that a 3D modeler has when they are adults. It covers what a 3D modeler is, the jobs for 3D modelers, the salaries, how to become a modeler, and the new job trends for modelers.
Some claims that the author makes are about the trends and what is needed to become a modeler. One claim is "3D modeling is a highly specialized field. As such, there is a high demand for 3D modelers in all industries." and to back it up, they use statistics saying that the job need for modelers will grow from 8% to 14%. Another claim is 3D modelers must have advanced math and computer skills. Other skills may be required depending on where the 3D modeler works." and backs it up by giving examples like "3D modelers in the film or video game industry must have above average creative and design skills, while 3D modelers in scientific fields may have a strong background in any given area of science."
The article's strengths are using good examples and having their information backed up. I also thought that the fun fact at the bottom of the page was cool. The article is also well written. Even though it is well written, the article is very brief and I think that it should have more examples and more claims and evidence in their article. Also, I think that the article should be more specific on the ways to become a 3D modeler. I felt that the sentences weren't specific and just gave a general idea of it. This could also go for the entire article.
I think that the author supports the main points. The author makes their claims short and to the point. The evidence is also convincing and if I were not an animator in learning, I would consider becoming an animator myself. I thought the article was well written and was eligible for everyone to read. I think ages 10 and up could read this article really easily because they did not use big words or words that were hard to understand.
Overall, I thought this article was okay. This was not the best article I have read but it was brief and to the point which I like. I think that the article could be a bit more specific and have more claims and evidence but did an okay job overall.
Link to article: http://www.animationcareerreview.com/articles/3d-modeler-career-profile
Tuesday, December 15, 2015
Personal Project Review (Unfinished Project)
For the entire first semester, I have been working on modeling the White House in maya. I am not the kind of person that likes to do a lot of animating, I am more of a modeler than an animator. I got the idea to model the White House from some family members and I agreed and chose to model the White House because I like the way the building looks and I really like architecture.

This was a pretty tough object to model for my first project of the year. The actual creation turned out really good, I was able to use some reference images of the front and the back sides of the house but the reference images were a bit hard to find because the side isn't as important as the front and back but I eventually found a picture of the side. This project was pretty easy for the most part but there was a lot of editing involved with this project, which I didn't mind but it was just a bit repetitive.

Along the way, I learned a lot of new tools like the multi-cut tool, fill hole tool, the spiral polygon, and the soft select tool. The multi-cut tool came in handy the most because it solved a lot of my problems that I had with the faces and edges on certain objects. The spiral/spring polygon tool came in handy because it helped me create the slide look that I wanted for my columns and parts on the side of my White House. The fill hole tool came in handy when I needed to fill in faces that were missing from accidentally deleting faces that I deleted a while ago or if the object was screwing up when I was transforming it. Sometimes it wouldn't work but for the most part it did. The soft select came in handy when I made my spiral for my columns. On my columns it came in handy because on the spiral parts, they had to go from large on the outside to small on the inside and the spirals also had to be pulled up gently so the soft select was used for all of that. I also learned how to extrude faces and edges better and I got to manipulate objects by using the extrude tool so I thought that was kind of cool. I also got to learn how to use the special duplicate tool which saved me a lot of time because I could make it make multiple copies and move them as far apart as I wanted to.

As far as collaboration, and teamwork goes, It went alright. I often asked for others' opinions that were sitting around me and I often gave them my opinion on their projects to try and help them. Sometimes my opinions didn't help and that is okay, as long as I gave them my opinion. I didn't really participate in much teamwork because my project was more of a one man job. I never really asked anyone to make my textures for me or model anything for me, I did everything myself. Now of course I asked for help from the teacher but I then would delete what was done to my project and do it myself so I could learn myself how to do it. As far as deadlines go, I did a pretty good job. I spent 95% of my time working hard and I had to stay after a lot more than expected. To meet my deadlines I had to stay after till 10:00 p.m. at least 5 or 6 times just so I could get my project done. Overall, I did a good job meeting deadlines and collaborated alright.

Something I would do differently would be duplicating the objects (such as the windows) because I extruded faces which wasted a lot of my time and caused lag. I eventually fixed this and made an object that looked the exact same as the object that I based it off of. This saved me a lot of time. I would also use the special duplicate tool right away next time. I wasted a lot of time on the front because I didn't know how to use the tool or even know it existed. I will use it next time because it will help me save time and it won't be as tedious to duplicate one object and then move it a certain distance. I did that for a while and it took way too long and it caused me to not want to do this project for a bit. I eventually got it done and over with and that's when I learned that there was a special duplicate tool.

Something I will do the same next time is using the extrude tool. That tool came in handy so many times with this project and I actually had a bit of fun using this tool because it was easy to use. I would also use textures from the maya textures instead of creating my own texture because creating my own texture took time and most of the time they did not work.

I will not be creating another project this year, I will be continuing this project next semester by modeling, texturing, and animating the yard. A few of the things I will use to continue my project will be the extrude tool, and the special duplicate tool. I will also stay after more often so I can finish my project for eMagine. Staying after has helped me the most because I didn't ever get behind in class and I got to stay more focused than I did in class.

Overall, I think my project has turned out great and I am very proud of it (even though it was kind of hard to model at some points) because I worked so hard on this project. Many tears were shed, many headaches came on, and I got stuck quite often but I made it through this project and I will continue it, even if it will get harder. I think this will probably be one of my better projects and will be one of my favorites.


Wednesday, October 7, 2015
How To Create A Palm Tree In Maya: Technical Tutorial


2. Go to the attribute editor and click polyCylinder1 then change the hight to 12 and the radius to .5. then go to the subdivisions height and change the subdivisions to 6.

3. Next make a rectangular prism and make make it any size you want. You will be changing the size in the step after this.

4. Go to the attribute editor again and change the width to 5.5, the height to .05, and the depth to 2. Then go to the subdivisions width and change them from 1 to 6.

5. Now switch to top view (hit space then click the top view). Right click and switch to vertex mode. 14 yellow dots should show up. Select the yellow dots and with your scale tool, (R) move the vertices around to make a leaf shape like the example to the right. Make sure to not use the move tool or else the leaf will not be symmetrical. Your leaf should look like a football shape from the top view.

6. Next make a really thing rectangular prism. The height should be thicker than the leaf. The width should be very small and the length should be very long. (As shown in the picture to the right).

7. Now select the rectangular prism and rotate it. Then duplicate it (Command + D) and with the move tool (W) move the prism slightly to the right keep duplicating with small equal spaces in between each prism.

8. When all the prisms have been made and are equally spaced, duplicate all of those and rotate (E) them so they are symmetrical across axis.

9. Select the leaf first and then select all the small prisms at once.

10. Go up to Mesh then go to Booleans and click on Difference.

11. Repeat steps 9 and 10 for the other side of the leaf and your outcome should look like this:

12. To make the curve of the leaf, go to the top view of the leaf again and switch to vertex mode. and select the vertices that are on the tip of the leaf.

13. Go to the side view of the leaf and rotate the vertices and move them down to start the curve of the point.

14. Select the vertices of each individual subdivision of the leaf and repeats steps 12 and 13 to get the curve of the leaf. The outcome should look like this:

15. Deselect the leaf and create a sphere of any size.
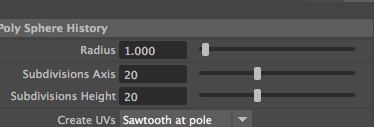
16. While still selecting the sphere, go to the attribute editor and change the radius to 1 and have both the subdivisions axis and height be 20.
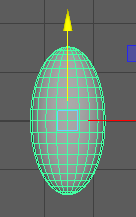
17. With the scale tool, (R) click and drag the Y-Axis square upwards so it makes an egg shape.

18. Center the egg in the attribute editor. The egg coordinates should be at (0,0,0), (make sure the cylinder is at (0,0,0) too). Then select the egg and move it up to the top of the cylinder but make sure the top edges of the cylinder do not show.

19. With the egg shaped sphere selected, go to vertex mode and select a
random vertex.

20. Once the vertex is selected, use the move tool (W) and move it out and in a random direction.

21. Do this with every other vertex and you should get a blocky sphere like the one shown on the right.

22. Next select the leaf.

23. Duplicate (Command + D) the leaf and with the move tool, (W) move it away from the other leaf.

24. Duplicate (Command + D) those leaves and create multiple leaves for the palm tree. Create a good amount to fill up half of the palm tree's blocky sphere. Then spread the leaves out to get a view of each individual leaf.


25. When the leaves are spread out, select a leaf and with the scale tool, (R) scale the leaf to a different size. Make them skinnier, longer, shorter, wider, more bent or straight.
 26. Scale each leaf to be a different size and shape as shown in the example on the right.
27. Select about half the leaves and then right click, go to assign new material and click Lambert.

28. Go to the color and select a green color that would fit for a color for the leaves. Then select the other half of the leaves and do the same thing but make the color darker than the other leaves. Do not forget to name the Lambert textures.

29. Select the tree trunk and follow steps 27 and 28 except make the lambert a tan color. Then name the color Tree_Trunk.

30. Select the blocky sphere and follow steps 27 and 28. This time, make the blocky sphere a darker color than the tree trunk. The outcome should look similar to the example on the right.

31. After the leaves and trunk is colored, select a leaf and move (W) the leaf to the top of the tree. Then with the Rotate tool, (E) rotate it so it touches the blocky sphere of the tree and so it looks like it is sticking out from the tree.

 32. Do this with each of the leaves, make sure each different colored leaf is somewhat separated from the same colored leaf. Make sure the leaves do not go through each other and that the leaves only go half way to two thirds of the way down the blocky sphere. Be careful to not leave any spaces on the blocky sphere without leaves.
33. Create two spheres of any size, you will adjust the sizes based on the tree size afterwards. Click on both of the spheres and then right click, go to assign new material and click lambert. Name the lambert "Coconut" and choose a yellow - green color.


34. Move the spheres up to the blocky sphere. Make sure the spheres are slightly touching each other and the blocky sphere. The spheres will be sitting just under the base of the leaves.

35. Next go to the side view (any side) and right click then go to edge mode. With your move tool, (W) select the edges that are horizontal and move them to the left or right so the base of the tree trunk is curved. The tree base should look similar to the example on the right.
36. The final product should look similar to the example on the right.
This technical tutorial blog is going to teach students and possibly some adults how to make a palm tree or a coconut tree. The tutorial takes some patience because there is quite a few steps in this specific tutorial. This tutorial blog will help those who are possibly needing to make a beach or an island with some palm trees or even just wanting to make a palm tree. It was also made to hopefully clarify some troubles students are having while making some leaves or even the trunk. This could be an important skill because making a palm tree will help those practice making leaves on a tree or the base/trunk of the tree. The steps above will guide students how to make a palm/coconut tree.
Links to help:
www.youtube.com/watch?v=DZaV7xcoLFc
or
http://www.3dtotal.com/index_tutorial_detailed.php?id=725#.VhbDGJ1VhHw
Friday, September 4, 2015
Professional Project Review
The scope of the project was to create a funny short that has 2 different perspectives of 2 different minds. The goal was to make it funny and entertaining for all ages. During the making of the animated short, a lot of storyboarding was involved. 3D animation software was used for everything. Some special effects were also used to create dust and concrete falling. There was not a deadline for the project but I can tell that the teamwork and the collaboration was great. I bet some people did specific shots or some worked on the people and some worked on the special effects and some worked on the settings or if this was one person he/she just did everything which is incredible. Something I would do differently would be animating the characters. The characters moved a little roughly in some parts. Another thing I would change would be the textures. In my opinion, a lot of the textures are the same so I would try and mix it up a bit. The things I would do the same are the details in the background and the different shapes of the aliens, each alien has a different shape. The sound effects they used in this were great too. For example, the screaming from the aliens was unique and funny and then the sound of buildings being crushed was on point. Also, the story line was awesome. I would not change one thing about the story line. They didn't make it too short and they didn't drag it on to where I got bored of it. Overall, the whole animation short was great and I would watch it over and over again.
Wednesday, May 20, 2015
Josh Gets Abducted (Final Project)
We started out with the idea to create an animation where someone gets abducted. We started out with raw footage of Josh and the green screen. Markus, Josh, Aaron and Matt were in charge of the video, I didn't take part with the filming. We had to use two different kinds of shots because we could not figure out how to cut the video in half with After Effects. I think the green screen lighting could have been slightly brighter so there wouldn't be any shadows. Other than that the filming went well.

While the guys were filming Josh against the green screen, I was upstairs working on modeling a Saucer. It took me a bit to review Maya but it turned out better than I expected. I had to model it first (which was pretty easy) and then I textured it. Then I had the idea to give it some pazazz and add lights. I knew what I wanted to do with the lights (which was make them blink at different times) but it was a little frusterating when trying to make them blink on and off at the same time. I finally got fed up with it and decided to get help, turns out it was a lot easier to make them blink at different times than I thought it was. Lastly, I animated it. I made it spin but then it was easing in and out so I checked the graph editor and the keys weren't there. I searched for a while but then ended up getting help to try and find the keys. But eventually I got it done and it turned out really nice in my opinion.


Choosing the type of background we were gonna use was pretty simple. For the Earth image we just had to choose an image that would kinda match the lighting on Josh's face and the lighting for the saucer animation. Choosing a background for space was probably the easiest choice to make out of the 3 images. Lastly, the other planet image was probably the hardest because we really wanted to make the lighting match with Josh's face, and it did. I thought the background color and shades matched the color of the lighting on Josh. Matt was the one that picked out most of the images and sound effects for the animation.
This was the final product of all of the "things" combined. Markus was the one that pretty much put it all together. I personally think that the finished product turned out better than I thought it would. He did the normal routine of key lighting and adding all the different layers to the animation. Overall, I actually really liked the idea of having a group project as our final in animation. We only had a week or two to put this together but having a group project made it easier to put together because we could work on different parts of the animation and then put them together in the end. I think this project was super cool and super fun and I enjoyed it in the end. This project turned out way better than expected.
Subscribe to:
Comments (Atom)